Metrc Retail ID provides a powerful way to increase product transparency and efficiency through dynamic QR codes on product labels. To fully take advantage of its unit serialization and compliance features, you need to know how to incorporate the QR code into your current workflow.
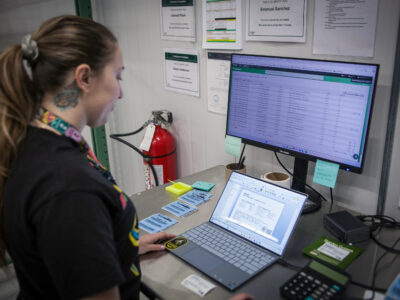
With software like ZebraDesigner and BarTender, you can easily incorporate Retail IDs into your labels. ZebraDesigner and BarTender specialize in high-speed, structured label printing by pulling data from CSV files and automating serialization for compliance tracking. BarTender offers additional flexibility in label automation and integration with enterprise systems.
Whether you’re printing labels for bulk orders or customizing them for compliance, follow these steps to ensure accuracy and efficiency.
- Step 1: Ensure proper unit serialization
- Step 2: Export CSV data from system
- Step 3: Format and print labels with your software (Zebra Designer & Bartender deep dive)
- Step 4: Validate post-print accuracy
What is Metrc Retail ID?
Metrc Retail ID leverages QR code technology to provide unique product identification and labeling for individual items. It is designed to enhance supply chain transparency, improve operational efficiency, and bolster regulatory compliance.
Who benefits from Metrc Retail ID?
- Brands – Generate QR codes for Test Passed or Retest Passed inventory to streamline tracking.
- Distributors & Transporters – Reduce handling time and ensure seamless inventory movement.
- Retailers & Dispensaries – Speed up checkouts by scanning Metrc Package UIDs.
- Consumers – Gain instant access to COAs (Certificate of Analysis), product origin, and compliance details with a single QR scan from a mobile device.
Step 1: Ensuring proper unit serialization
Proper serialization ensures every product is tracked correctly through Metrc.
Why print unique serialized codes?
Printing unique serialized QR codes for each label enables precise traceability throughout the supply chain. This is particularly valuable for:
- Inventory management – Prevents duplication errors and enables better tracking.
- Compliance auditing – Helps ensure each product is uniquely identified, reducing the risk of regulatory infractions.
- Retail efficiency – Improves tracking at the store level by allowing easy scanning of individual units.
Here’s how to verify that your labels meet compliance standards:
Before printing labels
- Double-check each label contains a unique QR code tied to the correct product.
- Verify product details (THC %, Batch Number, Expiration Date) match Metrc records.
- Verify labels meet your state’s regulatory requirements.
- Ensure barcode/QR code scanning works before full-scale printing.
Step 2: Export CSV data from Metrc Retail ID
Before formatting labels, you need to extract product data from Metrc.
For step-by-step guides on formatting and printing labels, refer to the relevant software documentation:
- ZebraDesigner Essentials – User Guide
- BarTender – Support Guide
How to Export CSV data from Metrc:
- Log in to Metrc – Use your credentials to access the system.
- Navigate to the “Product Labels” tab – Found under the “Packages” section.
- Search for the Package – Choose the items for which you need labels.
- Click “Download Labels” – Select CSV Format instead of PDF.
- Choose the number of labels required – Consider adding 5% extra for misprints.
- Save the CSV file – Store it in an accessible location on your computer.
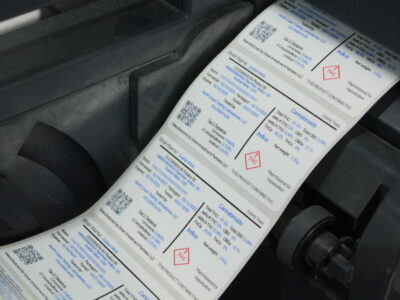
Now, you have a structured CSV file containing all necessary details for serialized Retail ID QR codes, including Unit Code, Index, Reel, and Kind columns when exporting from Product Labels within Metrc.
Step 3: Formatting and printing labels with your printing software
ZebraDesigner
Once you have the CSV file, you’ll need to use ZebraDesigner to create a label template and link it to your data.
Why use ZebraDesigner?
Zebra industrial printers are optimized for high-speed label printing, ensuring accuracy and efficiency in cannabis labeling. When paired with ZebraDesigner, the system:
- Automates bulk label printing, reducing human errors and manual entry.
- Ensures compliance by integrating with Metrc and other seed-to-sale systems.
- Supports database connectivity, eliminating the need for manual barcode and text input.
Setting up your label in ZebraDesigner:
- Open ZebraDesigner – Ensure the software is installed and your Zebra printer is connected.
- Create a New Label Template:
- Select your Zebra printer model.
- Choose the label size that fits your packaging.
- Import the CSV Data:
- Click Database Connection Wizard and choose CSV File as the source (Ensure you select “Text File Database” for CSV to avoid mistakenly choosing “Excel Database”).
- Browse for the exported Metrc CSV file.
- Select the correct column headers (e.g. Unit Code).
- Insert Text & Barcode Fields:
- Drag and drop text fields to display product details.
- Add a QR code element and link it to the Retail ID field from the CSV file.
- Preview & Print:
- Click Preview to check that the data appears correctly.
- Print a test label before running a full batch.
Note: ZebraDesigner automates bulk printing while ensuring unit serialization is correctly applied.
Zebra Designer 3 Pro – Serialization
Use the steps below to set up QR code serialization in Zebra Designer 3 Pro using your Metrc CSV file.
- Open label template.
- From the Home tab, use the Barcode utility to add a barcode to the label.
- From the Data tab, add the CSV file from the Product Labels download in Metrc.
- When selecting Tables and Fields, select the column with the URLs for the Retail ID QR codes and click “Add” to move it to Selected Fields.
- Database Wizard View:

- Set “Label Copies per Record” to Number of printed labels defined by a field in the database.
- Click Finish.
- Change Barcode Type to QR.
- Settings found when selecting barcode view:
- Settings found when selecting barcode view:
- Resize QR code accordingly.
- Under the Source column, set the data to the variable URL field on the linked CSV.
- Print.


Automating label printing with BarTender
BarTender provides a fully automated solution for businesses looking to eliminate manual printing steps and integrate label generation with existing inventory systems.
Why use a BarTender?
- Advanced automation – Handles bulk label printing with manual setup.
- Better database connectivity – Supports SQL, ERP, and multiple database integrations.
- Multi-printer support – Works with multiple printer brands beyond Zebra.
Setting up a CSV integration in BarTender:
- Create a new label template:
- Use Named Data Sources for dynamic label fields.
- Connect the CSV file:
- Use Integration Builder to map CSV fields to BarTender variables.
- Automate printing:
- Set up triggers to detect new CSV files and automatically print labels.
- Deploy the integration:
- Run a test print and deploy the automation to your production environment.
BarTender’s ability to fully automate CSV-driven label generation makes it a powerful option for businesses managing high volumes of Metrc-labeled products.
Step 4: Post-printing verification
- Scan a sample set of labels to confirm accurate tracking.
- Compare printed labels to Metrc’s inventory records.
- If errors occur, troubleshoot by revisiting your ZebraDesigner, Adobe Acrobat setup or re-exporting the CSV file. You can also reach out to Metrc Support.
POS and ERP integration with Metrc Retail ID
Metrc Retail ID integrates with third-party POS and ERP systems for automated data synchronization. This helps maintain data consistency across platforms, reducing manual entry errors and improving operational efficiency【9†source】.
Retail ID for checkout and compliance tracking
Retail ID is gaining support across multiple retail platforms, allowing it to function similarly to traditional UPC barcodes. Instead of requiring relabeling, retailers can scan and process Retail ID QR codes at checkout, ensuring accurate compliance tracking while streamlining inventory workflows.
Several POS and ERP integrators have implemented Retail ID support, including:
This means that retailers using these platforms can reduce relabeling, scan and process Retail ID QR codes just like traditional UPC barcodes, reducing manual data entry while ensuring accurate compliance tracking. If your customers use these systems, adopting Retail ID labels could help streamline their checkout and inventory workflows.
Using Retail ID QR codes in ERP labeling systems
For teams using ERP or seed-to-sale platforms like StashStock, Distru, or Canix, Retail ID QR codes can often be imported directly into each platform’s label generator or print template system.
These systems typically allow you to:
- Import Retail ID QR code links as part of your product or package data
- Map the Retail ID URL to a label field in your template
- Automatically generate QR codes at print time — no scripting or image prep required
- Ensure the QR is printed alongside other required fields like batch ID, strain, test results, etc.
Consumer experience: Scanning Retail ID QR codes
Once a product is labeled with a Retail ID QR code, consumers can scan it using their phone to gain real-time access to:
- COAs (Certificate of Analysis)
- Product origin details
- Batch-specific compliance data
This access to information enhances consumer confidence by providing instant transparency about the product.
Labeling with Metrc Retail ID can be efficient and accurate when using the right tools. Businesses that require high customization and branding flexibility may prefer ZebraDesigner + Adobe, while those seeking full automation and multi-printer compatibility may consider BarTender.
By following these steps, you can streamline the labeling process while increasing transparency and efficiency.For further assistance, reach out to Metrc or consult with your labeling software provider.